Multi-Tool Container Security Scanning with AWS Integration
Container security scanning has become essential in modern DevSecOps workflows. This walkthrough demonstrates building KubeScan, a multi-tool container security scanner that integrates Trivy, Grype, and Snyk for vulnerability detection with AWS ECR integration and EKS deployment.
Why Multiple Security Scanners?
Different tools have different strengths in vulnerability detection:
- Trivy: Coverage for OS packages, application dependencies, and Kubernetes configurations
- Grype: SBOM-driven package matching with good accuracy
- Snyk: Developer-focused scanning with detailed remediation guidance
Using multiple scanners together improves coverage and reduces false negatives that could slip through a single tool.
Features
Multi-Tool Security Integration
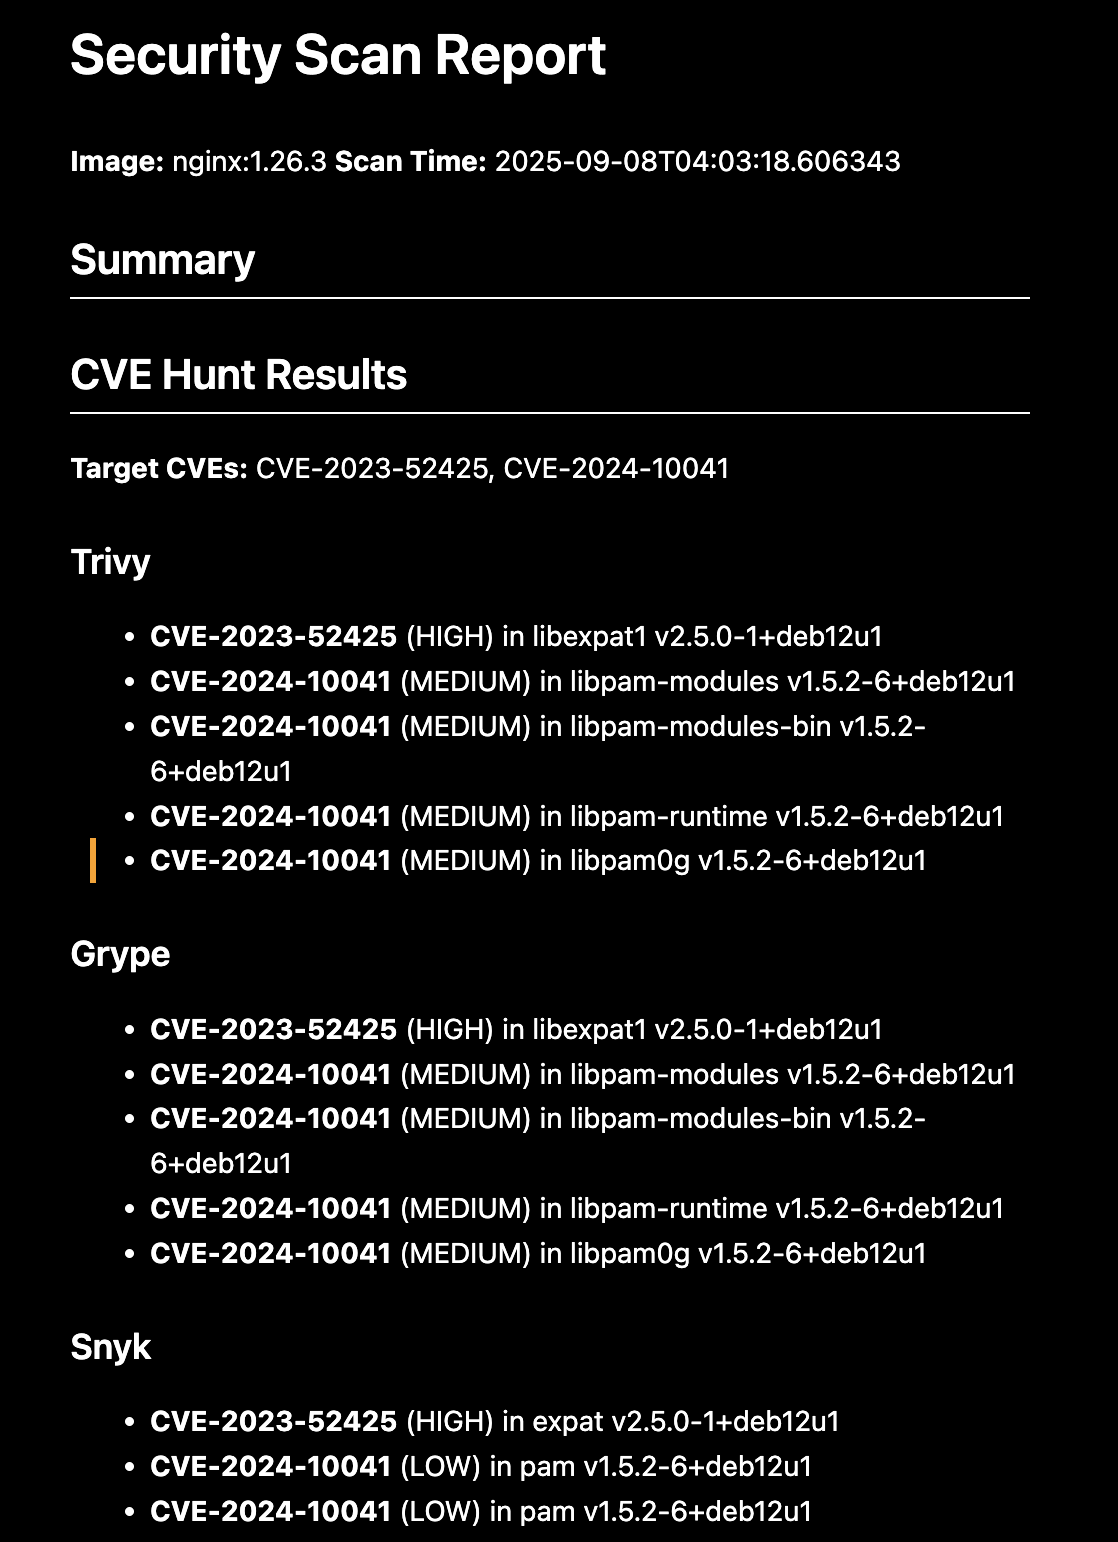
The scanner orchestrates scanning across Trivy, Grype, and Snyk while providing unified reporting with vulnerability aggregation and comparison. It also enables CVE hunting across multiple scanner databases for comprehensive coverage.
AWS Cloud Integration
The platform provides ECR registry support for seamless image building and pushing, while EKS cluster deployment includes automated security scanning capabilities. Reports are centrally stored in S3 for analysis and compliance tracking.
DevSecOps Automation
Pre-push vulnerability gates use configurable thresholds to prevent vulnerable images from reaching production. The system includes automated CronJob scanning in Kubernetes clusters and generates both JSON and Markdown reports for different consumption needs.
Implementation Walkthrough
1. Environment Setup
The project includes automated tool installation:
git clone https://github.com/ToluGIT/containerscanner.git
cd kubescan

# Install all security tools
chmod +x infrastructure/*.sh
./infrastructure/setup-tools.sh
The script automatically installs the container security scanner tools as mentioned above, if you prefer to install them individually, you can do so with the commands below.
For manual installation:
# Trivy
curl -sfL https://raw.githubusercontent.com/aquasecurity/trivy/main/contrib/install.sh | sudo sh -s -- -b /usr/local/bin

# Grype
curl -sSfL https://raw.githubusercontent.com/anchore/grype/main/install.sh | sudo sh -s -- -b /usr/local/bin

# Snyk
npm install -g snyk
snyk auth
2. Multi-Scanner Orchestration
The core scanner orchestrator (scanners/scan.py) coordinates all tools and normalizes their output:
# Scan with all tools
python3 scanners/scan.py nginx:1.26.3

# Hunt specific CVEs across scanners
python3 scanners/scan.py nginx:1.26.3 \
  --hunt-cves CVE-2023-52425 CVE-2024-10041

# Use specific tools only
python3 scanners/scan.py busybox:1.36 \
  --tools trivy grype \
  --output-dir ./reports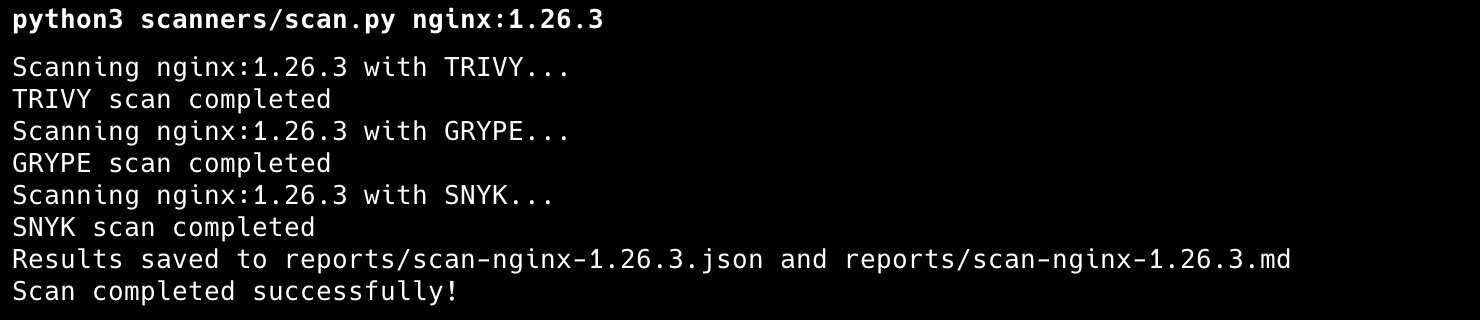

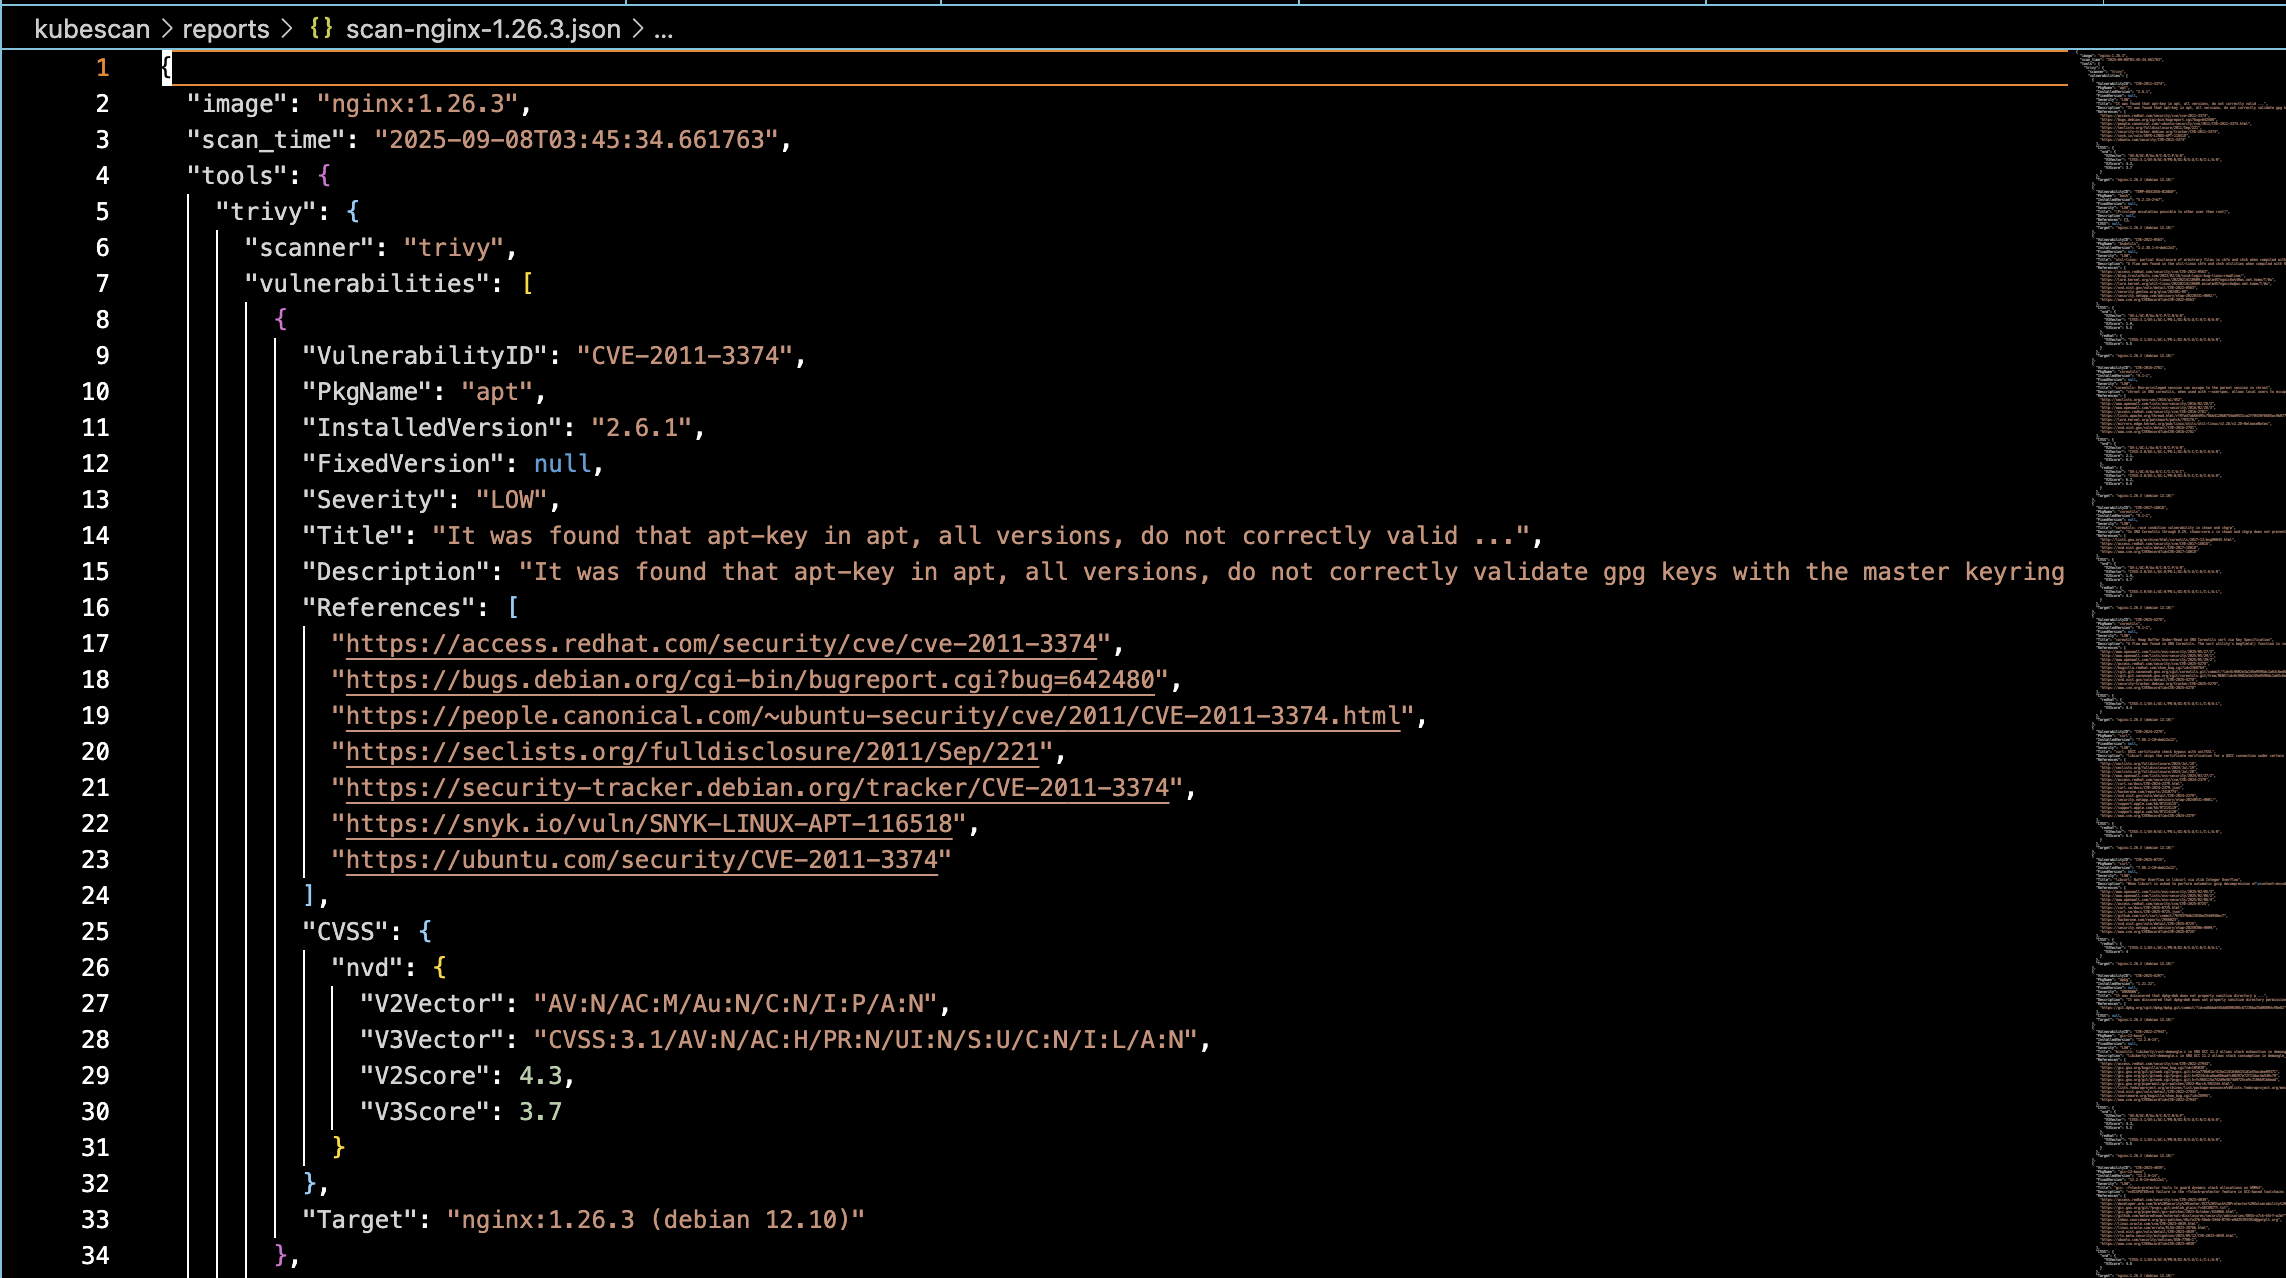
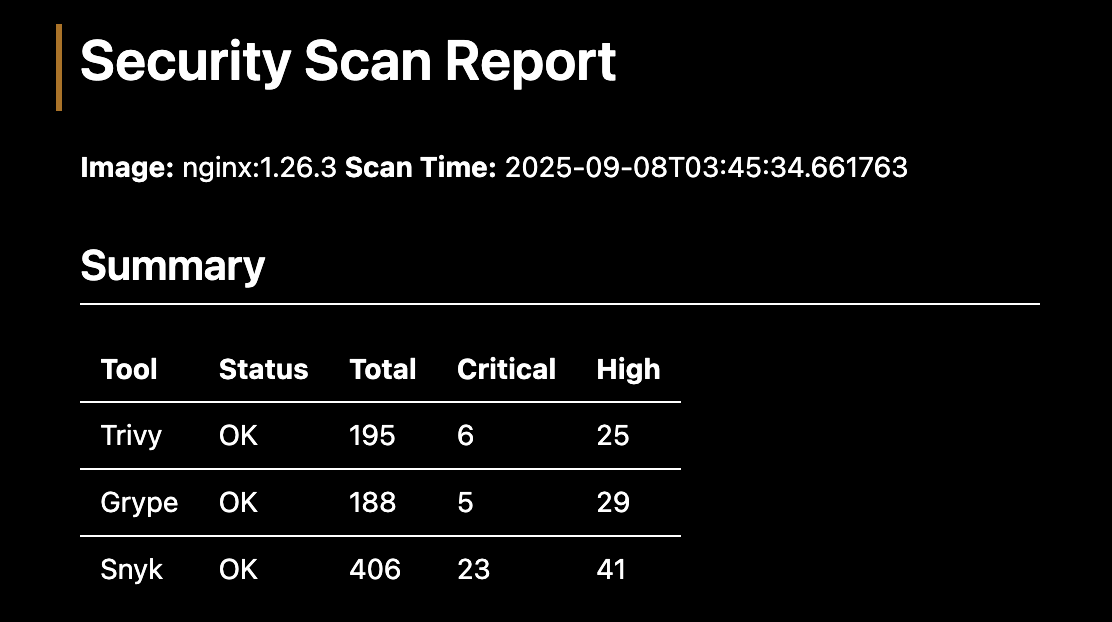
The orchestrator provides a unified CLI interface across all scanners with normalized JSON output format. It handles vulnerability aggregation and deduplication while generating cross-tool comparison reports for analysis.
3. Supply Chain Analysis
Analyze multiple base images for supply chain vulnerabilities:
# Scan common base images
mkdir -p reports
while IFS= read -r image; do
  [ -z "$image" ] && continue
  case "$image" in \#*) continue;; esac

  echo "Scanning $image..."
  python3 scanners/scan.py "$image" \
    --tools trivy grype \
    --output-dir reports \
    --output-name "supply-chain-$(echo "$image" | tr '/:' '-')"
done < scenarios/vulnerable-images.txt

# Generate supply chain report
python3 << 'PY'
import json, glob
from collections import Counter

all_vulns = []
for file in glob.glob('reports/supply-chain-*.json'):
    with open(file) as f:
        data = json.load(f)
    for results in (data.get('tools') or {}).values():
        vulns = results.get('vulnerabilities') or []
        all_vulns.extend(vulns)

cve_counts = Counter(v.get('VulnerabilityID') for v in all_vulns if v.get('VulnerabilityID'))
print('Top 10 most common CVEs in supply chain:')
for cve, count in cve_counts.most_common(10):
    print(f'  {cve}: {count} occurrences')
PY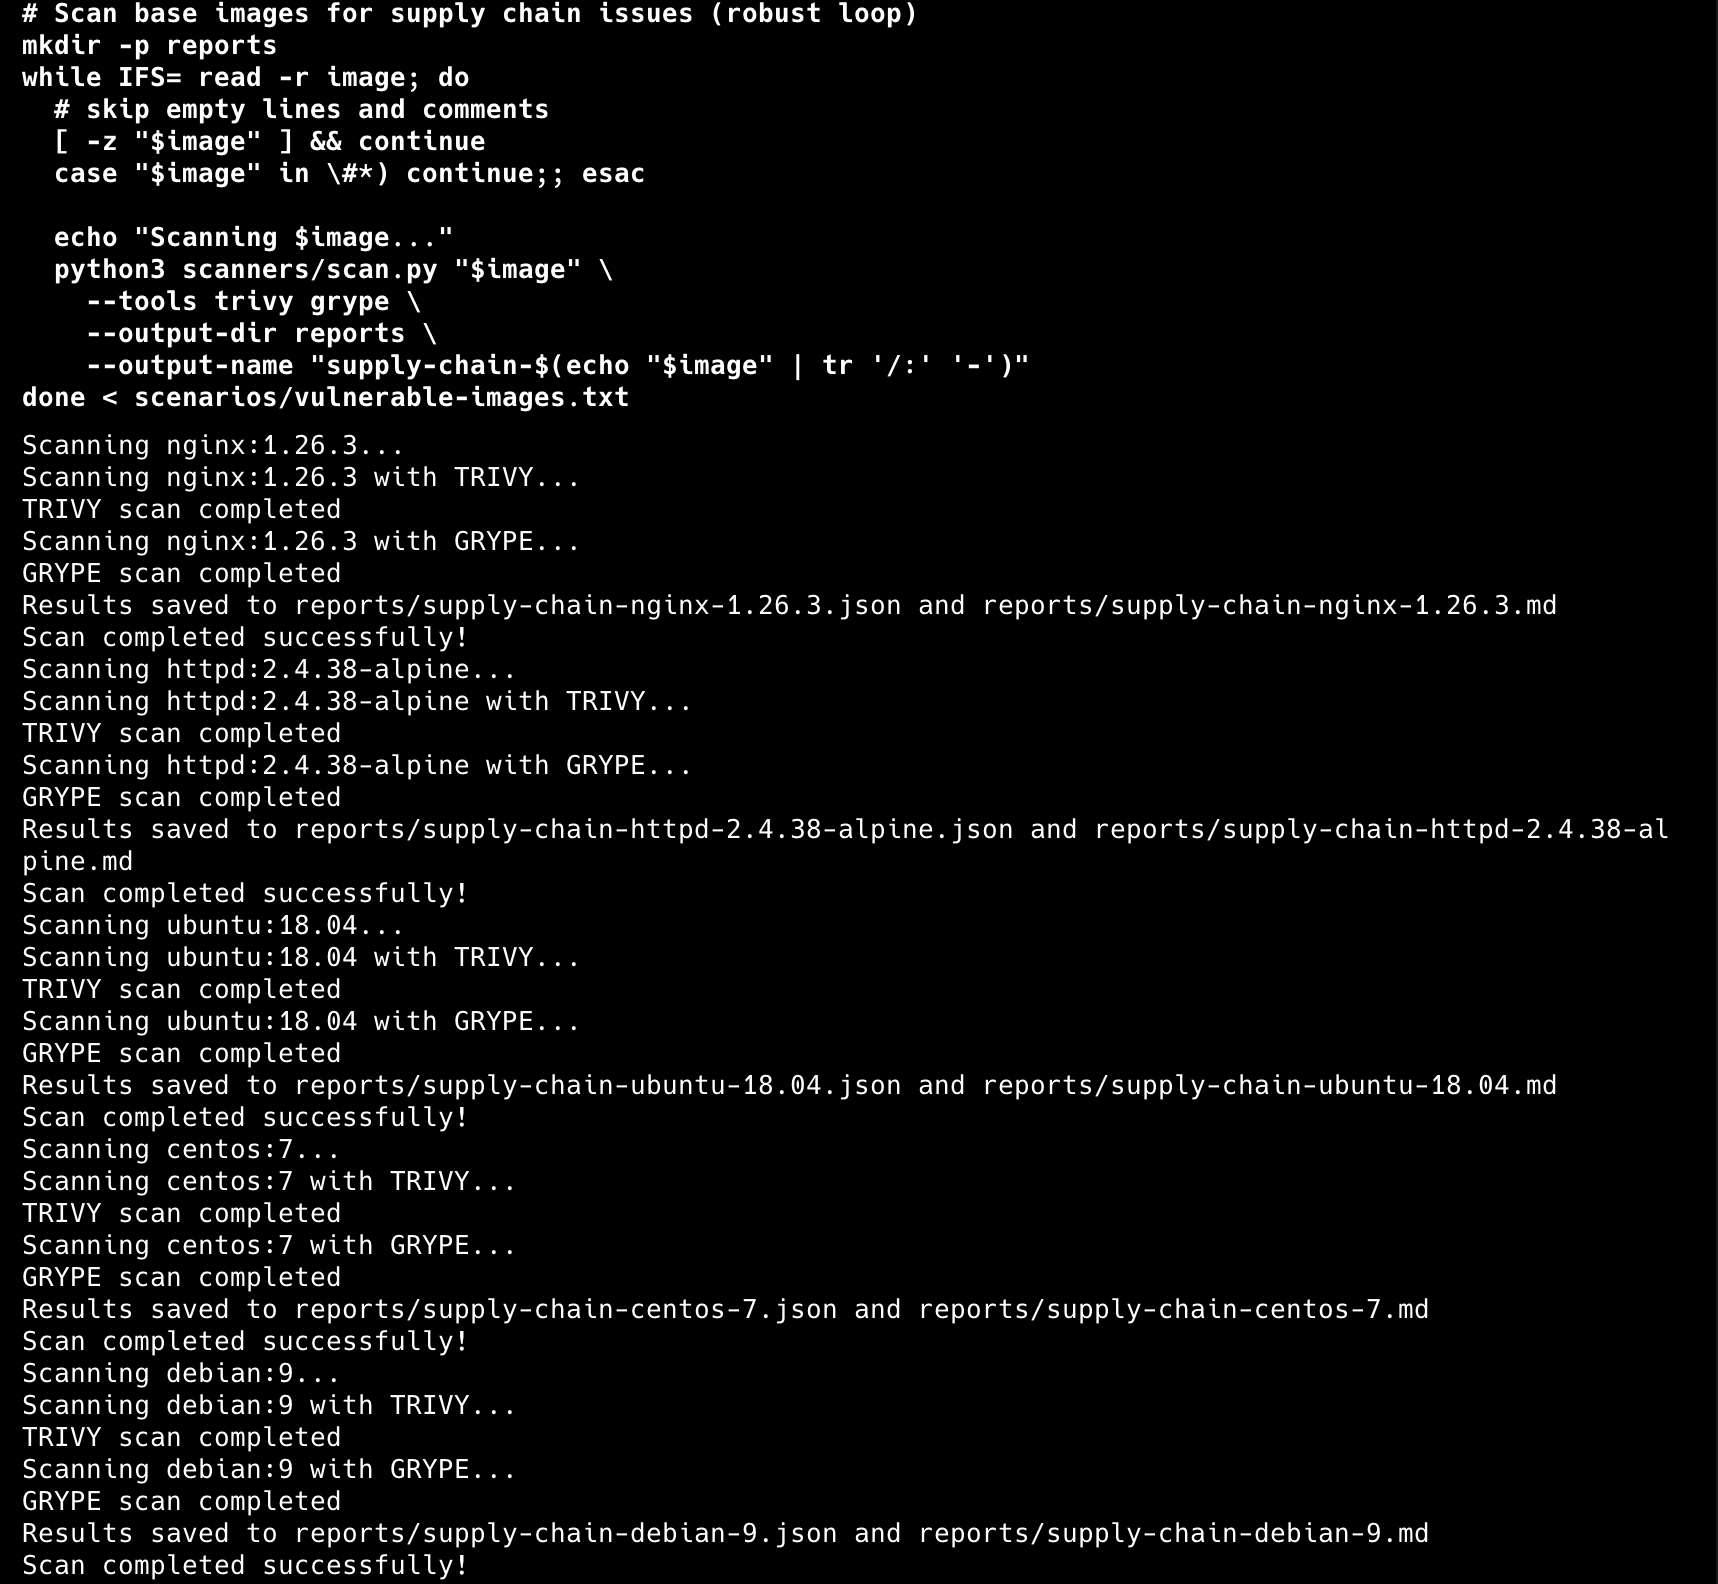
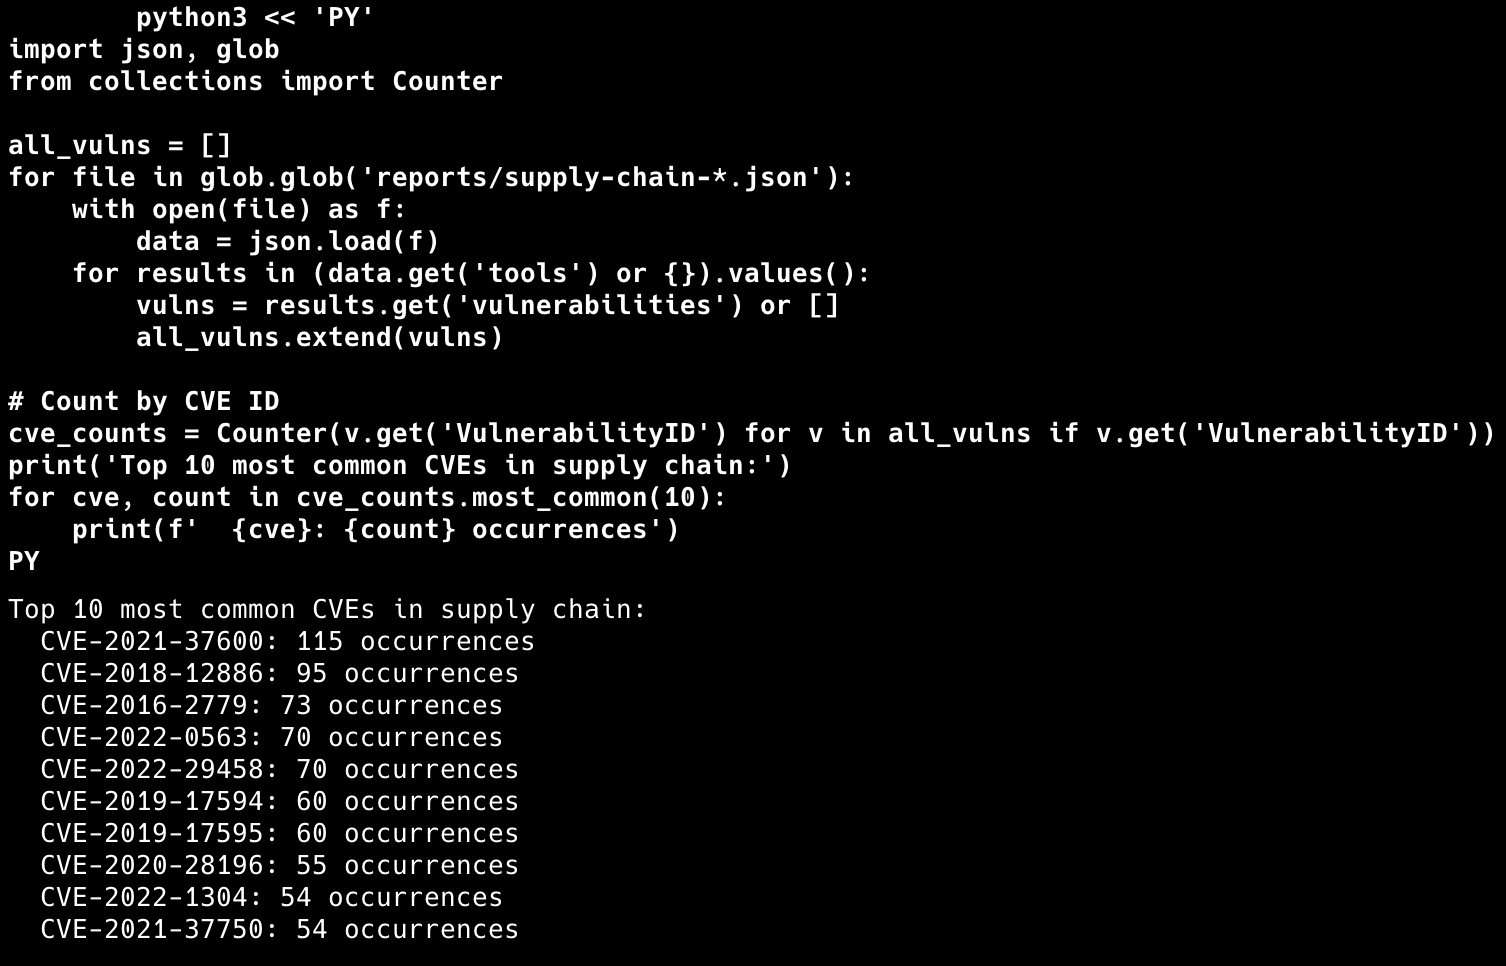
This approach reveals common vulnerabilities across your container supply chain and helps prioritize remediation efforts.
4. Containerized Scanning
For environments where installing tools locally isn’t preferred:
# Build the scanner container
docker build -t kubescan:local .

# Run containerized scan
docker run --rm -v "$(pwd)/reports:/app/reports" \
  kubescan:local busybox:1.36 --tools trivy grype
The Dockerfile packages all security tools into a single container for consistent scanning across environments.
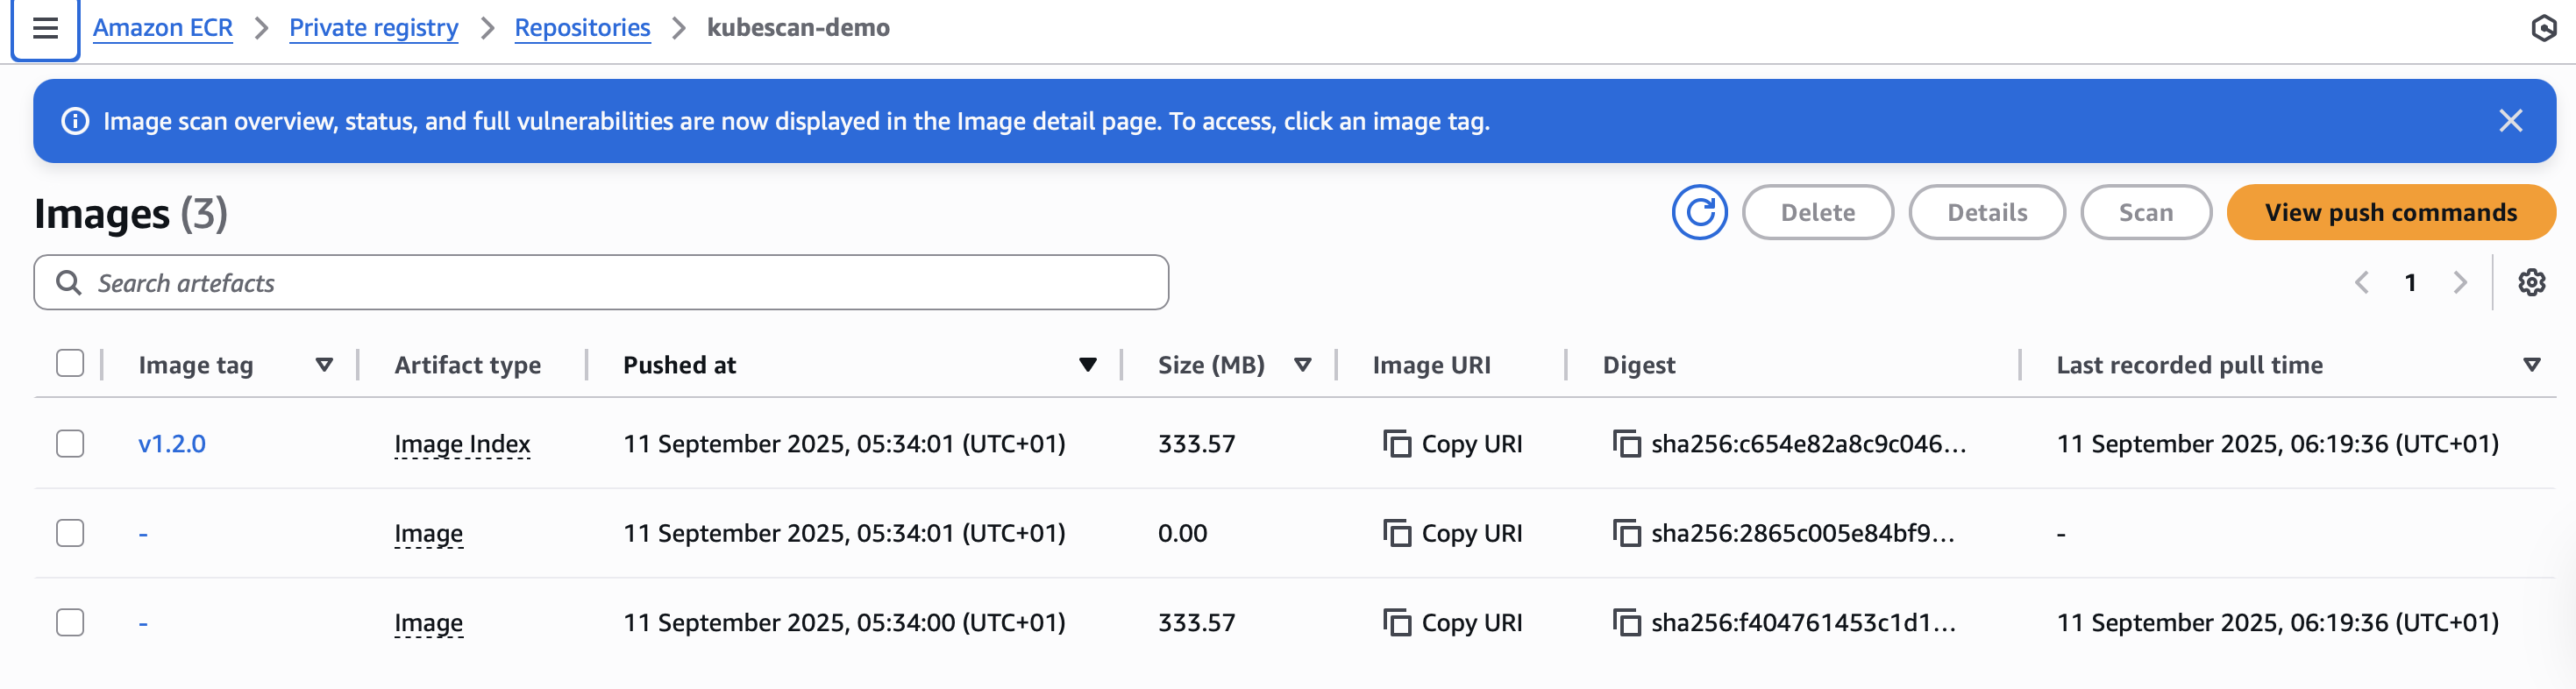
5. AWS ECR Integration
Implement pre-push security gates with ECR:
# Setup ECR repository
./infrastructure/ecr-setup.sh --name kubescan-demo --region us-east-1

# Build, scan, and conditionally push
./infrastructure/ecr-push.sh --tag v1.0.0

# Cross-platform builds
./infrastructure/ecr-push.sh --tag v1.0.0 --platform linux/amd64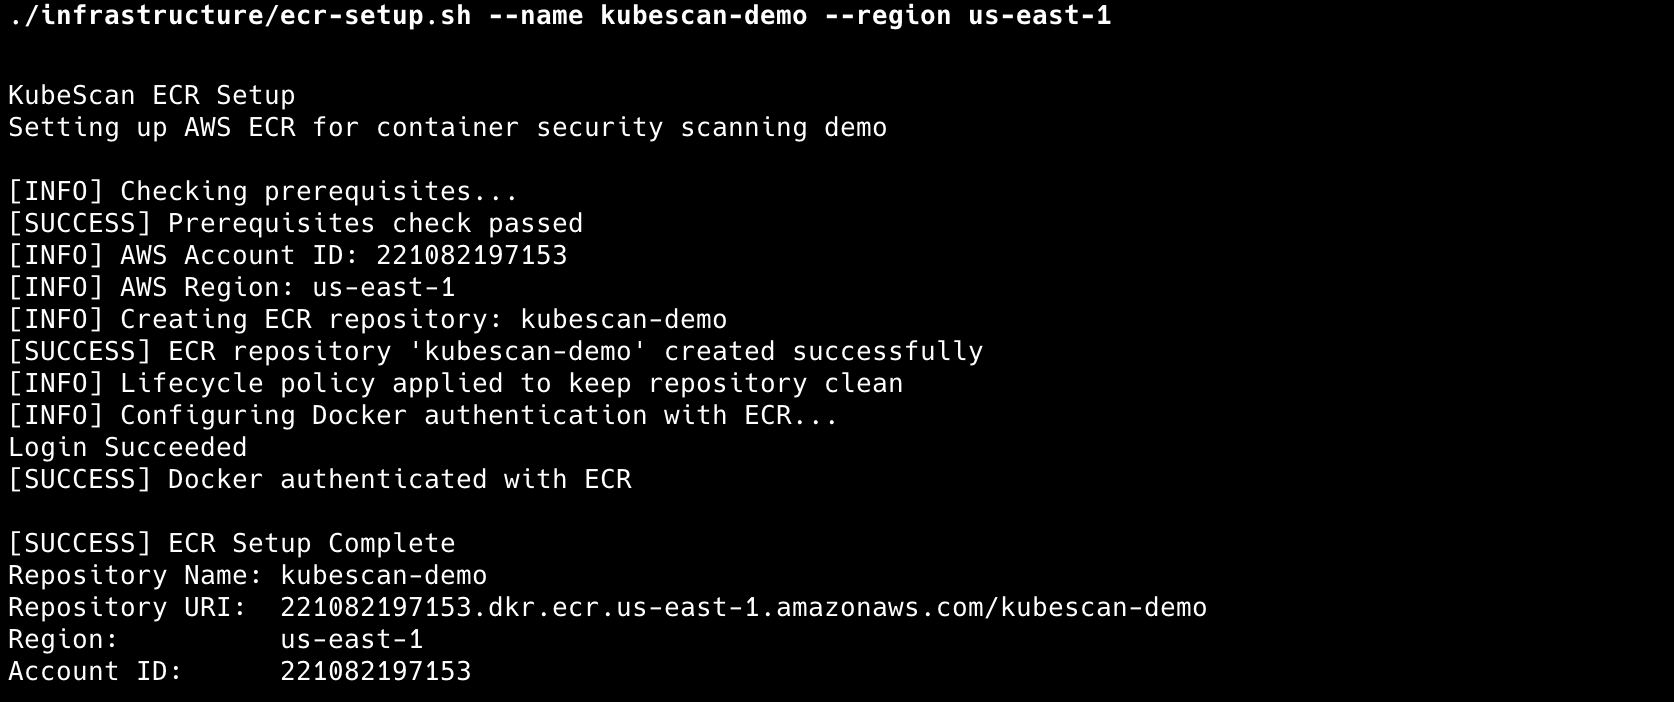

We review the scan output and get a confirmation prompt; for this demo we’ll choose “yes” to proceed so we can move to the next phase. The goal is to show a pre-push gate that can block unsafe images before they ever reach a registry or production.
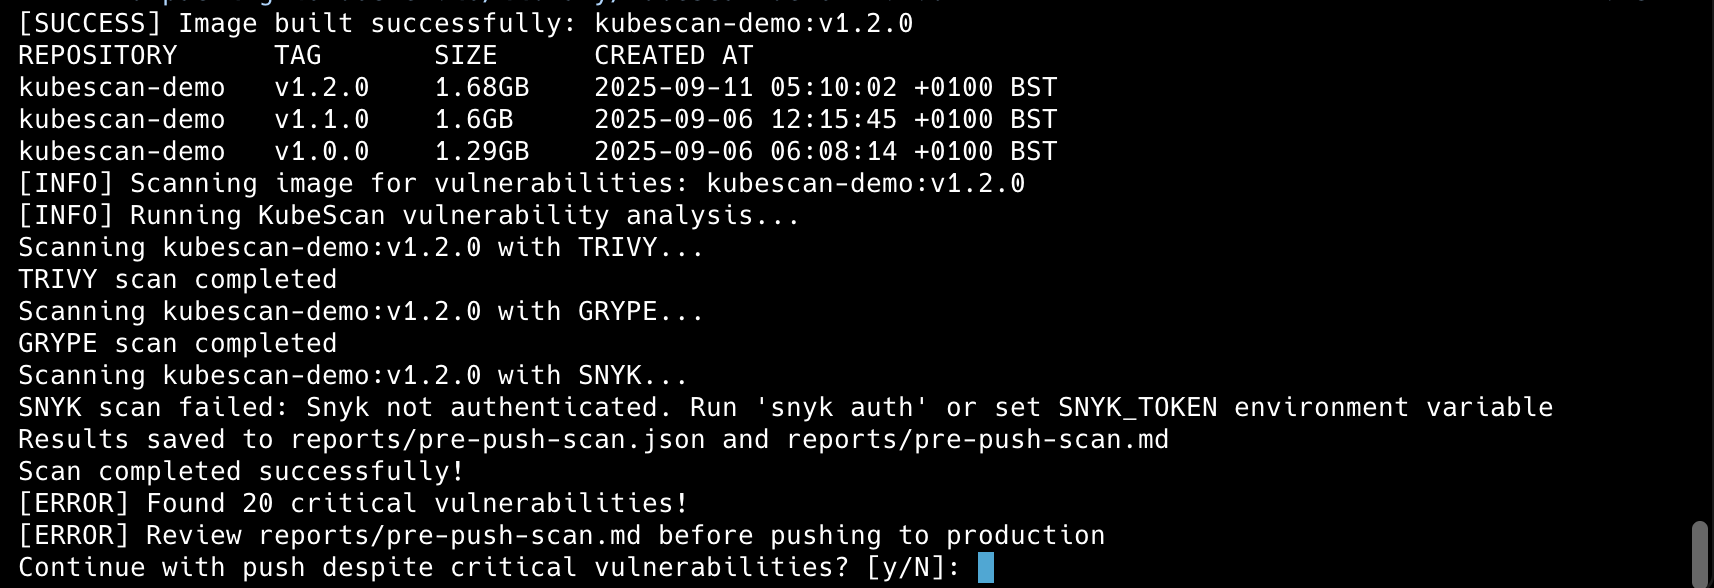
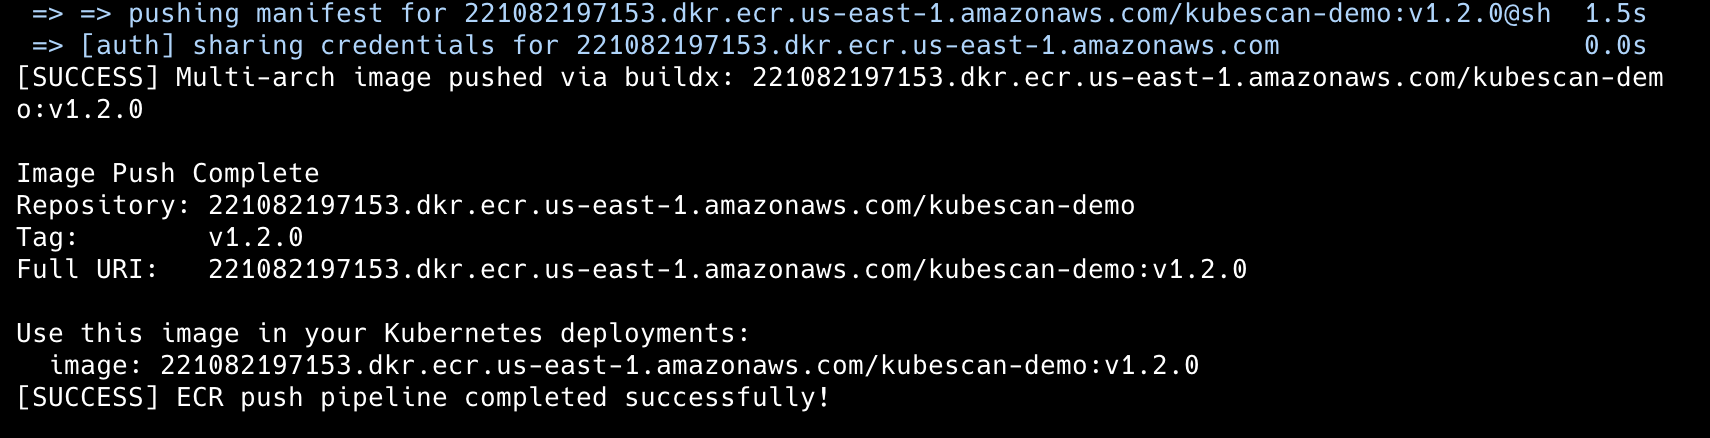
The ECR integration includes automated repository creation and configuration with pre-push vulnerability scanning using configurable thresholds. Interactive confirmation prompts appear for images with critical vulnerabilities, and the system supports cross-platform builds for different architectures.
6. EKS Deployment and Automation
Deploy automated scanning in EKS:
# Create EKS cluster with security configurations
./infrastructure/create-cluster.sh --name kubescan-demo

# Setup S3 for report storage
./infrastructure/s3-simple-setup.sh

# Deploy scanner as CronJob
./infrastructure/deploy-s3-simple.sh

# Deploy test applications
kubectl apply -f scenarios/deploy-test-pods.yaml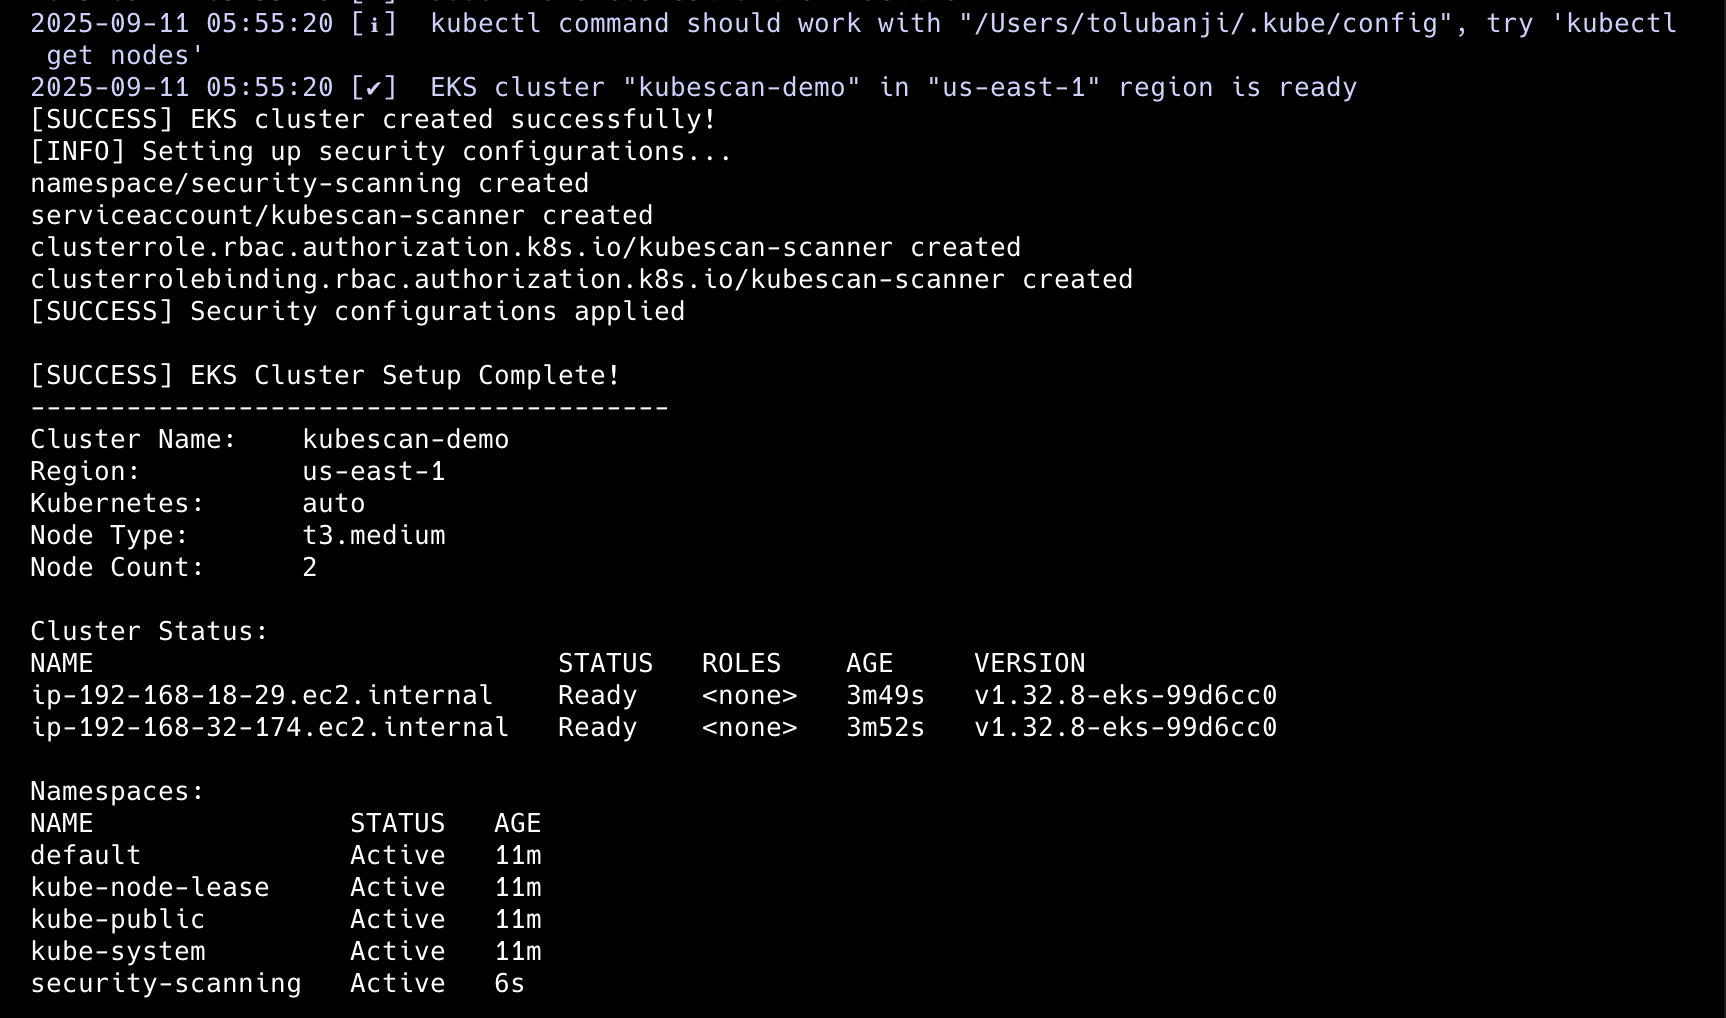

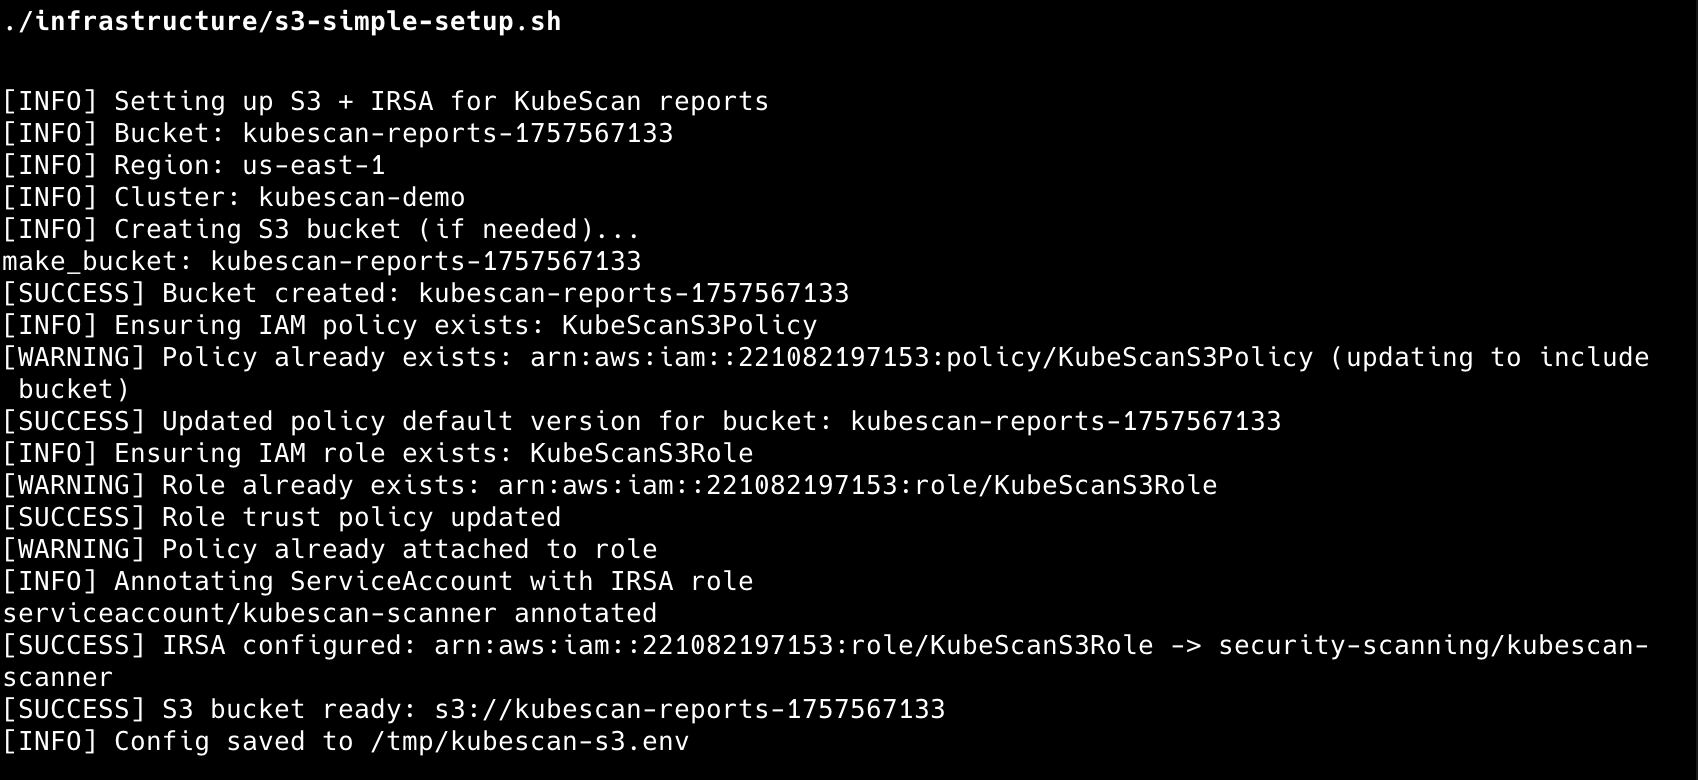
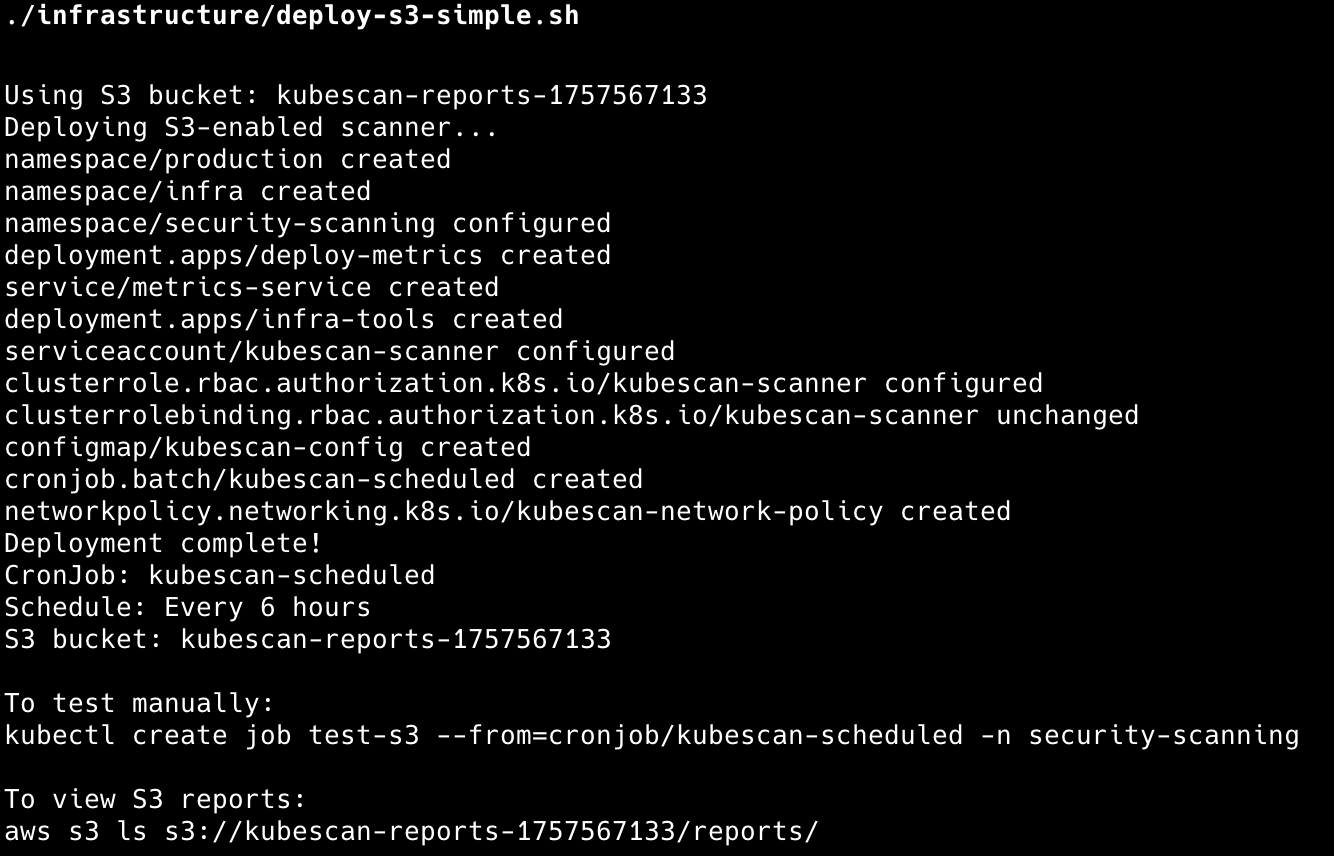
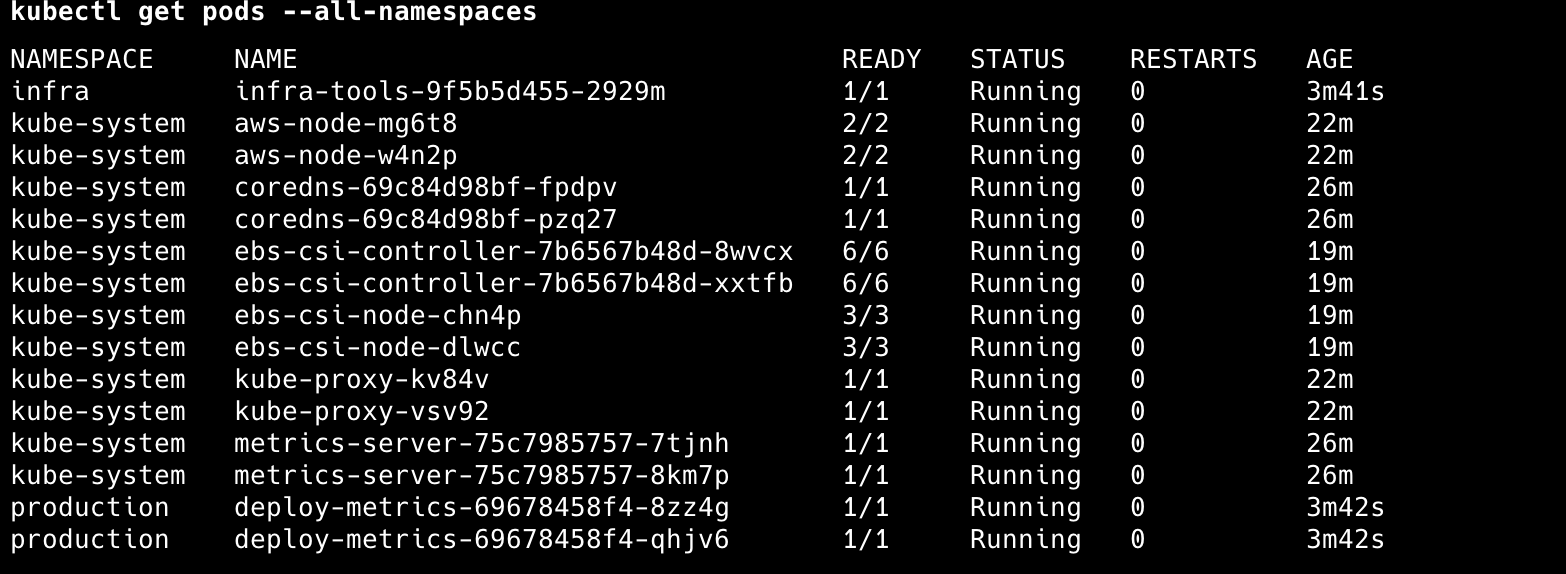
The EKS deployment includes OIDC provider configuration for seamless IAM integration and creates a security-scanning namespace with proper RBAC controls. A CronJob automatically scans cluster images every 6 hours and uploads results to S3 for report storage.
7. Cluster Scanning Verification
Trigger and monitor scanning jobs:
# Manual scan trigger
kubectl create job test-s3 --from=cronjob/kubescan-scheduled -n security-scanning
# Monitor scan progress
kubectl logs -n security-scanning job/test-s3 -f
# Verify images in target namespaces
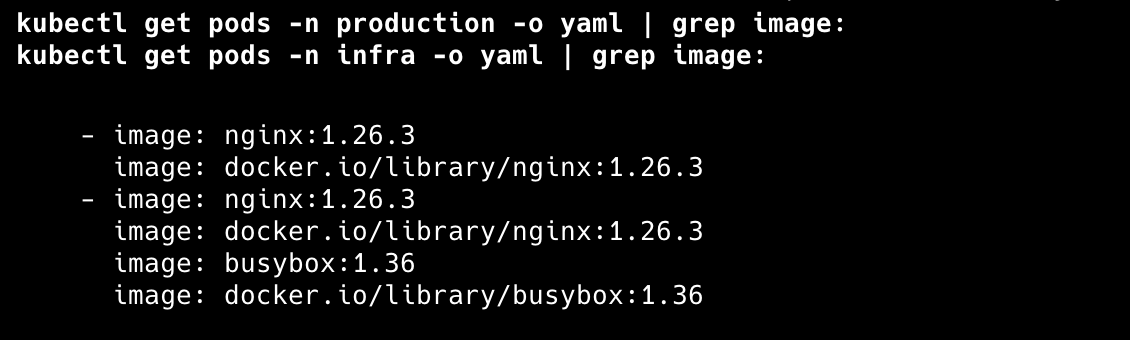
kubectl get pods -n production -o yaml | grep image:
kubectl get pods -n infra -o yaml | grep image:We can see that the following images are deployed within the following namespaces:
Now let’s run and verify by triggering our multi-tool scanner configured to run a job:
kubectl create job test-s3 --from=cronjob/kubescan-scheduled -n security-scanning
And also watch the logs:
kubectl logs -n security-scanning job/test-s3 -f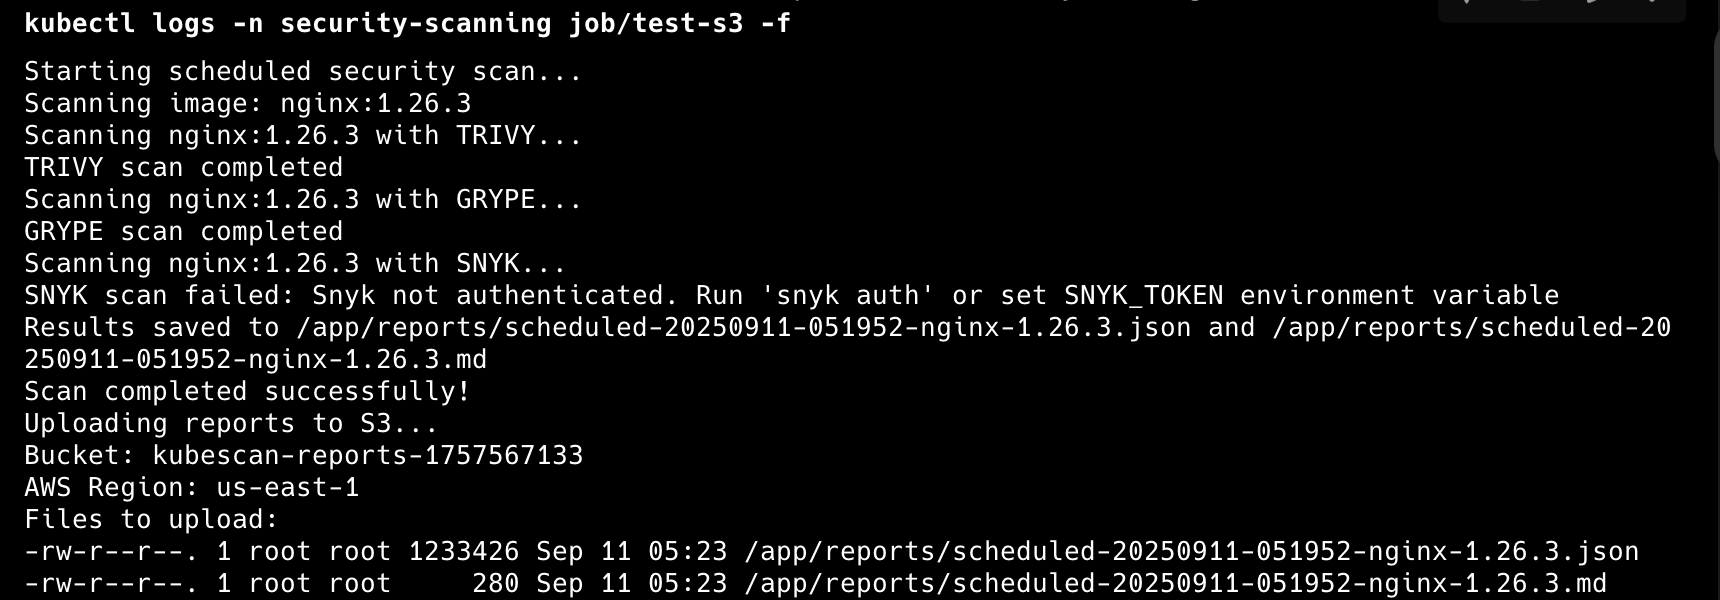
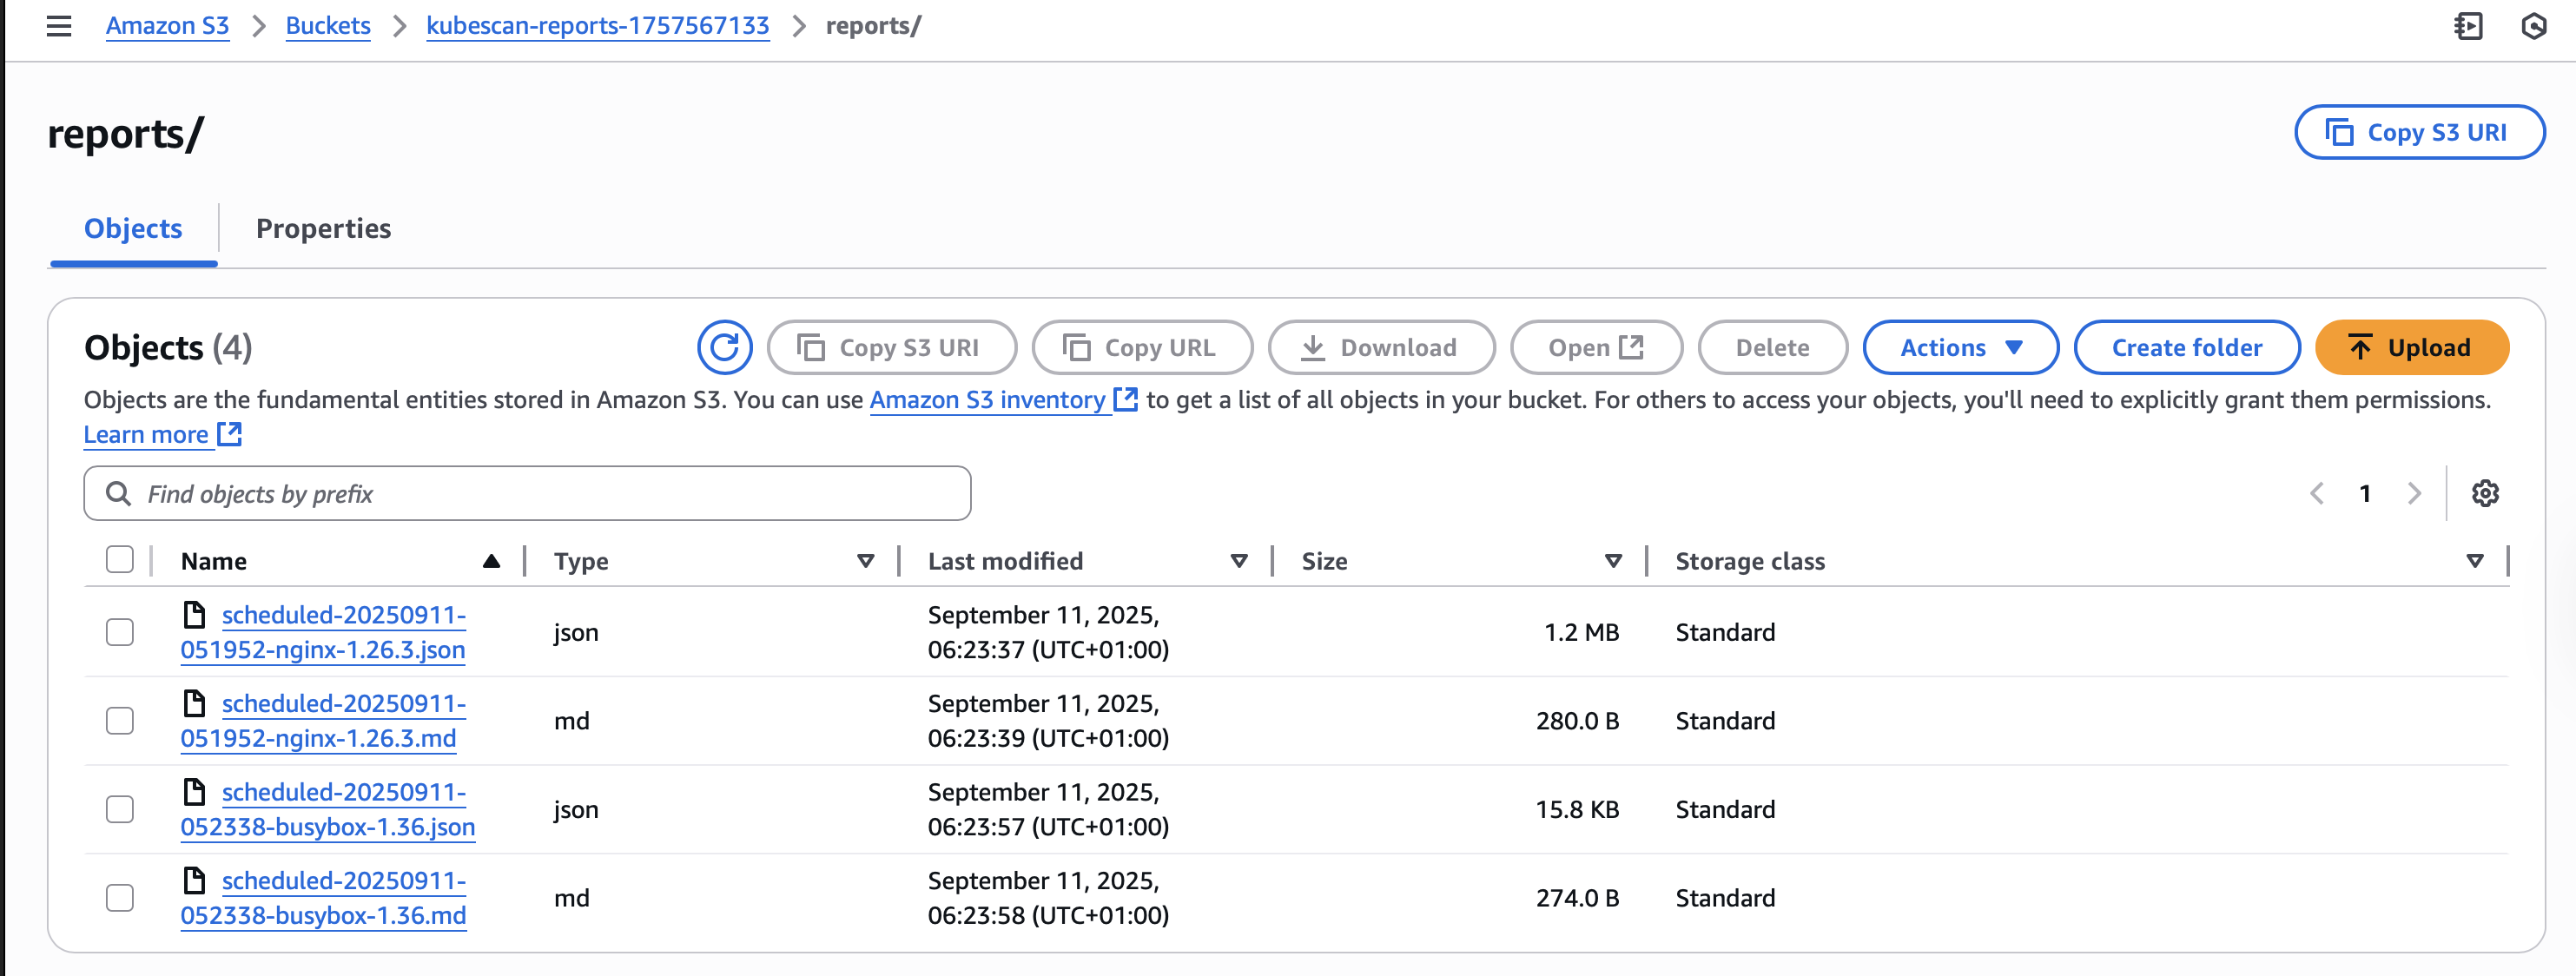
The scanner automatically discovers and scans all images in specified namespaces, uploading detailed reports for analysis.
Output Formats
The scanner generates multiple output formats:
- JSON: Machine-readable results for automation and integration
- Markdown: Human-friendly reports with vulnerability summaries
Each report includes vulnerability counts categorized by severity levels (Critical, High) along with tool coverage comparison metrics.
Tool Comparison
Understanding each tool’s strengths helps optimize scanning strategies:
Trivy Advantages:
- OS and application dependency coverage
- Kubernetes configuration scanning
- Fast scanning with efficient caching
- Strong integration ecosystem
Grype Advantages:
- SBOM-based vulnerability matching
- Excellent package detection accuracy
- Detailed vulnerability metadata
- Good performance on large images
Snyk Advantages:
- Developer-focused remediation guidance
- Strong application dependency analysis
- Detailed fix recommendations
- Good integration with development workflows
Cleanup
Remove AWS resources to avoid ongoing costs:
./infrastructure/cleanup-cluster.shThis script removes:
- EKS cluster and associated resources
- ECR repositories
- IAM roles and policies
Best Practices and Recommendations
Scanning Strategy
Using multiple scanners ensures vulnerability coverage that single tools might miss. Implement scanning at multiple pipeline stages including pre-push, post-build, and runtime phases while configuring appropriate vulnerability thresholds for different environments.
AWS Integration
Implement least-privilege IAM policies for scanner permissions to maintain security boundaries while storing reports centrally in S3 for analysis and compliance requirements. Monitor scanning costs and optimize scanner frequency based on your security requirements.
DevSecOps Integration
Gate deployments based on critical vulnerability findings while providing clear remediation guidance to development teams. Track vulnerability trends over time to measure security posture improvements and integrate findings into existing ticketing and workflow systems for streamlined remediation processes.
For container security knowledge:
Related Security Tools
- Falco: Runtime security monitoring and threat detection
- OPA Gatekeeper: Policy enforcement for Kubernetes
- Kube-bench: CIS Kubernetes benchmark testing